The Art of Growing Dye Plants
The Art of Growing Dye Plants
(aka How to follow a chart to make pretty colors)
By: Spazmeister
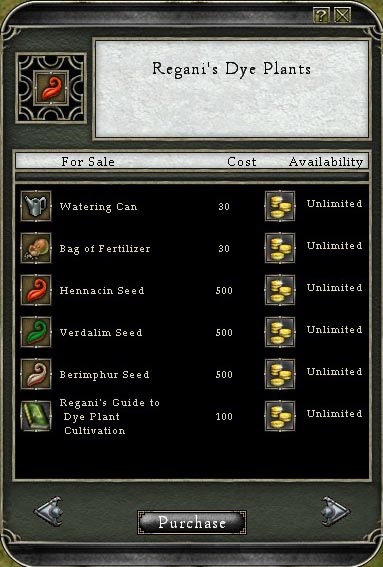
To begin your journey to become a grower of dye plants, choose your favorite means of recall to Cragstone and head East out of town to the lonely homestead of Regani (32.0N, 10.5W). Regani will be your one stop shop for all your dye needs from now until the end of time. Oddly enough, she only sells 6 items which is more than enough for you to make any color dye that exists in the game.

First, let’s look at Regani’s Guide to Dye Plant Cultivation, which is a quick, down and dirty explanation of how the dye plant growing process works.
“For many years I have been studying the various flora used in the dyeing of clothing and armor and have been frustrated at the rarity of these plants in nature. That being the case, I have devoted myself to the art of cultivating these plants and, after many failed attempts, I have finally perfected the art! This small guide will explain to you how you too can grow dye plants.
First, you will need to get a seed. The seeds that I offer are very special though, and can only be planted in the rich soil surrounding my humble cabin. Although this may feel very limiting, do not fear! The enchantments allow the plant to mature at an astonishing rate. Why within a few minutes of being planted, you'll have a dye plant in full bloom!
After the seed has been planted, you will need to give it constant attention! The plant will need to be watered or fertilized almost constantly. If you fail to give your plant the attention it needs, your plant will die!
Once your plant has reached full maturity, you will be able to harvest it.
You may notice in cultivating your plant that it is covered in pollen. This pollen is very useful in creating hybrid plants! Feel free to experiment with this pollen and see what you can create!”
~ Regani’s Guide to Dye Plant Cultivation
The Basics
Let’s look at how the process actually works.
There are 3 different components of a dye plant:
| The dye seed (You will always start with a seed) |
| The dye pollen (The pollen is where the magic happens) |
| The dye plant (This is what you have after) |
We are going to start with growing your first dye plant
First, you need to purchase a Watering Can* and a Bag of Fertilizer*. Each item has an initial durability of 100/100. That means you can water a plant 100 times or fertilize a plant 100 times. Once the durability reaches 0, the item will vanish from your inventory. This isn’t really a big deal since the cost of these 2 items is relatively nothing. Before moving on, put the watering can and the bag of fertilizer onto your action bar. This will make the process considerably easier, allowing you to grow upwards of 4+ plants at a time once you become proficient in the process.
(*Watering Cans or Bags of Fertilizer do not stack on each other. Don’t buy more than you need!)
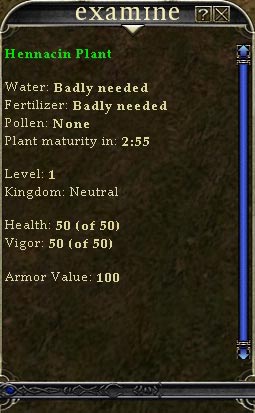
Now it’s time to start growing a dye plant. Go back to Regani and purchase a dye seed. It doesn’t matter which one, we are just learning the process. Now, find an area with some space (you can only grow dye plants inside the small fenced in area Regani has established) and double click the seed. The seed will now be planted and look like a miniature version of its full grow self you would find out in the world. Click on the tiny plant and examine it.
|
|
There are 4 parts of the examination window that we are interested in following.
First one we will talk about is Plant Maturity. All plants take 3 minutes to reach maturity. All you have to do is keep the seedling from dying in a 3 minute window. Next is Pollen. This is what you will use to change the color of the plant further down the road. We will talk more in detail about this later. For now, you can safely ignore the Pollen field. Now on to Water and Fertilizer. These work identically to each other. |
The water and fertilizer fields have 6 values.
None Needed
Needed
Badly Needed
Urgently Needed
Desperately Needed
Death Imminent!
When initially planted, all plants start at ‘Badly Needed’ in both fields. The status of each field will degrade randomly over time working down to ‘Death Imminent!’ All you have to do to successfully grow a plant is to keep it from dying. To do this, press the action key associated with your watering can or bag of fertilizer and when the target icon appears, click the plant. That is the whole process. The Water and Fertilizer fields do not have to be in the ‘None Needed’ state for the plant to mature, and the status of these 2 fields has no impact on the results from the plant maturing. This is either a pass (Mature Plant) or fail (You killed the plant) endeavor.
Now that the dye plant has reached maturity, pick it up from the ground and rejoice! If you were paying attention, you will notice that in addition to the plant, you also picked up pollen from that plant. Keep that for later, you’ll need it.
Congratulations! You now know how to grow Red, Dark Green, and Brown dye plants. No more searching the world for dye plants in the wild to dye your armor with.
Wait... What’s that you say? You want to grow different color dye plants? NO PROBLEM! Remember the Pollen you picked up from your first dye plant? Now it’s time to play MAD SCIENTIST!!! Actually, we’re just going to be botanists.
Look ma! I’m a botanist!
Head back to Regani and buy another seed, this time purchasing one you didn’t use before. Make sure you still have plenty of durability left on your Watering Can and Bag of Fertilizer. Find yourself another section of open real estate and plant that seed. Follow the same procedures as before except this time, double click the pollen you had from the previous plant and use it on the seedling you just planted. Notice how the pollen field changed from none to the formal name of the color of the pollen you used? Now keep watering and fertilizing the plant until it matures. Once it is done, pick up the plant and rejoice in your handy work! You’ve just discovered a new colored plan… errrr, seed?
So you discovered a new color seed. In fact, I bet you discovered 3 seeds. In fact I bet I can figure out what color seeds you discovered, assuming you purchased a different color seed this time. If you didn’t buy a different color seed, you received 3 seeds of the same color.
|
You planted a… |
You pollenated with… |
You received… |
|
Dark Green Seed |
Red Pollen |
3 Light Green Seeds |
|
Dark Green Seed |
Brown Pollen |
3 Bronze Seeds |
|
Red Seed |
Dark Green Pollen |
3 Light Green Seeds |
|
Red Seed |
Brown Pollen |
3 Gold Seeds |
|
Brown Seed |
Red Pollen |
3 Bronze Seeds |
|
Brown Seed |
Dark Green Pollen |
3 Gold Seeds |
By now, I’m sure you are wondering “How on earth did you know what color seeds I received and how many?” Well the answer is simple. I’ve done it. I’ve done it a whole lot. So much in fact, that I made a spreadsheet. Would you like to see it? I bet you would. TA-DAA!

***Acromatin removes all dye from a piece of armor.
At this point I’m sure you are looking at that chart and thinking “What the hell does all that mean?” Ok, let’s break this down into some detail.
Time to get Jiggy with it
Step 1: Keep Calm
Before we go over the chart, let’s cover some important facts:
Growing 1 plant from a seed will ALWAYS give 1 dye plant and 1 pollen of that color
1 Red Seed = 1 Red dye plant and 1 Red pollen
1 Black Seed = 1 Black dye plant and 1 Black pollen
Growing 1 plant from a seed and pollenating it will ALWAYS give seeds
Black, Pink, Orange and Acromatin Seeds are the exception. Pollenate these seeds at your own risk. I haven’t tried it and I don’t recommend you try it.
All that being said, let’s look at the chart again. Any seed color you start with and then pollenate will always produce seeds. Let’s say we want to make Gold dye plants. For that we need Gold seeds. From scratch, Gold can be made in 2 ways. Red seeds with Brown pollen and Brown seeds with Dark Green pollen. We’re going to focus on the first example.
To make Gold dye seeds we need to purchase 1 Red seed and 1 Brown seed. Since we need to pollenate the Red seed with Brown pollen, we will grow the Brown seed first. Once the Brown seed is grown, you have 1 Brown dye plant and 1 Brown pollen. Since the pollen is all we are interested in, you can sell the plant, or give it away, or trash it.
Now, plant the Red seed and pollenate it with Brown and let the seed mature. You now have 3 Gold seeds. Now you are free to take those 3 Gold seeds and run from there.
Tips and Tricks
Always plan ahead before you start making dye plants.
Failure to plan ahead can result in too many seeds of one color and not enough pollen of another. Planning ahead also allows you to use all of your builder colors (i.e. colors used to make other colors) instead of having some left over.
Work backwards
If you know you want Black dye and you only need 4 of the plants, work backwards from 4 Black dye seeds. This will minimize loss and allow you to know how much to buy up front.
Don’t forget about that high level pollen
Just because you shouldn’t pollenate Black seeds doesn’t mean you can’t use Black pollen to your advantage. Look at the chart and see what you can do with Black pollen before you decide it’s worthless.
Efficiency is key
When I make dye for my characters, I don’t do it 1 plant at a time. I’ll make 4-5 plants at a time to keep things moving. Besides, 3 minutes takes a long time to pass when you have 1 plant growing. When you are growing 5, 3 minutes passes in a matter of seconds.
Growing dye plants isn’t as expensive as you think
For 4k gold, I can make 6 Black dye plants. During this process, I also produce:
6 Black pollen
6 Dark Blue dye plants
6 Bronze dye plants
3 Red dye plants
1 Brown dye plant
I don’t think it would be that difficult to recover the 4k gold spent making the Black dye plants
Don’t screw yourself over selling dye plants
If you plan on selling dye plants to make money, don’t screw yourself. Remember, Black dye plants can be found in the world. Pink, Orange, and Acromatin can only be crafted, and most people either don’t have the time to do it, or won’t take the time to do it.

 Home
Home